DIY Custom Original Art
Step by step instructions on how to create your own fashion-forward and polished original art without breaking the bank!

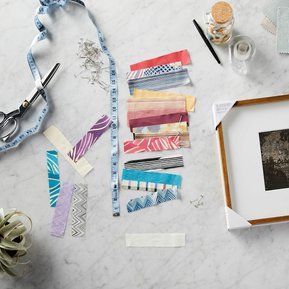
Materials
To create your own unique and stylish piece of art, you will need to have:
- Fabric or paint chip swatches (we used some from a fabric sample book, you can go to your local design center and ask if they have any old swatches they want to get rid of. Free is the right price!)
- Frame with glass and matte
- Measuring tape
- Pencil
- Tape
- Scissors
- Fabric pins


Fabric Selection
Take a look through all of your swatches and start to think about which ones you would like to use. Some characteristics to consider while you're selecting are: color, texture, pattern and how they will all work together. If you're designing the art for a specific room in your home, what colors might best coordinate with your decor and furnishings? If you are making it as a gift, what's the style of the person you're giving it to? Mark off the swatches as you go with a pin or tape so you know which ones you need to cut.
Measure and Cut
Measure the width of your matte and cut each swatch out an extra 1 to 2 inches longer than the matte. This way there will be plenty of extra material to tape it to the matte. Plan to cut out enough strips to fill the matte opening, you can always go back and cut more if you end up needing to fill out more space.

Arrange and Tape
Start playing around with the order and arrangement of the swatches. Have the variations of color and pattern play off of each other. When you get to a good place, overlap (starting at the top) and tighten up the space between the swatches. Double check the length of the matte opening and make sure you have enough swatches layered to fill the space with a little overlap. Tape or pin the swatch strips to each other so you can securely transfer them to the matte and frame.

Finishing Touch!
Use tape to fasten the strips to the matte board and remove any pins that may be holding the strips together. Check and make sure everything is secure before adding the matte to the frame. Insert the matte into the back of frame and seal it tight!
Voila! Now you have a personally curated piece of custom art!

As always, have fun!
The last instruction is to have fun! (I know we did when we created the images for the story! Thanks for the photo bomb Will!)
For more inspiring DIY content, check out stylist for this story Kat McAllen's instagram @design.of.my.life